> ## Documentation Index
> Fetch the complete documentation index at: https://www.anything.com/docs/llms.txt
> Use this file to discover all available pages before exploring further.
# Discord
> Integrate Discord messaging capabilities into your application
Connect your app to Discord's messaging platform to send notifications, build chatbots, and interact with users through Discord's popular messaging service.
## Overview
Sign up and configure your Discord Developer Portal.
Create a Discord bot and obtain your bot token.
Turn on these settings to have the best experience with Discord.
Add your credentials to Anything's secrets.
## Account setup
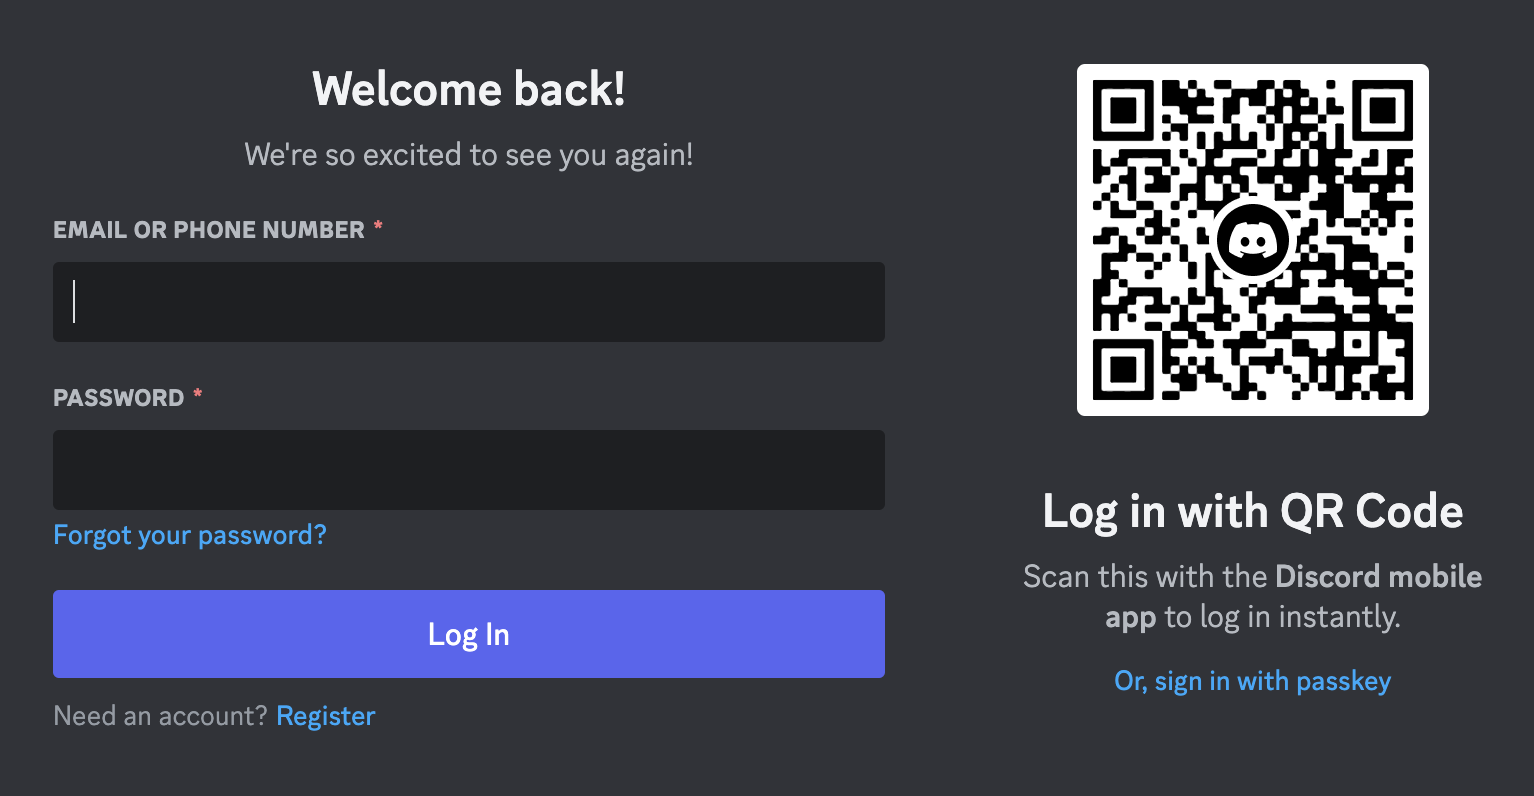
Go to [Discord Developer Portal](https://discord.com/developers/applications) and sign up with your account.
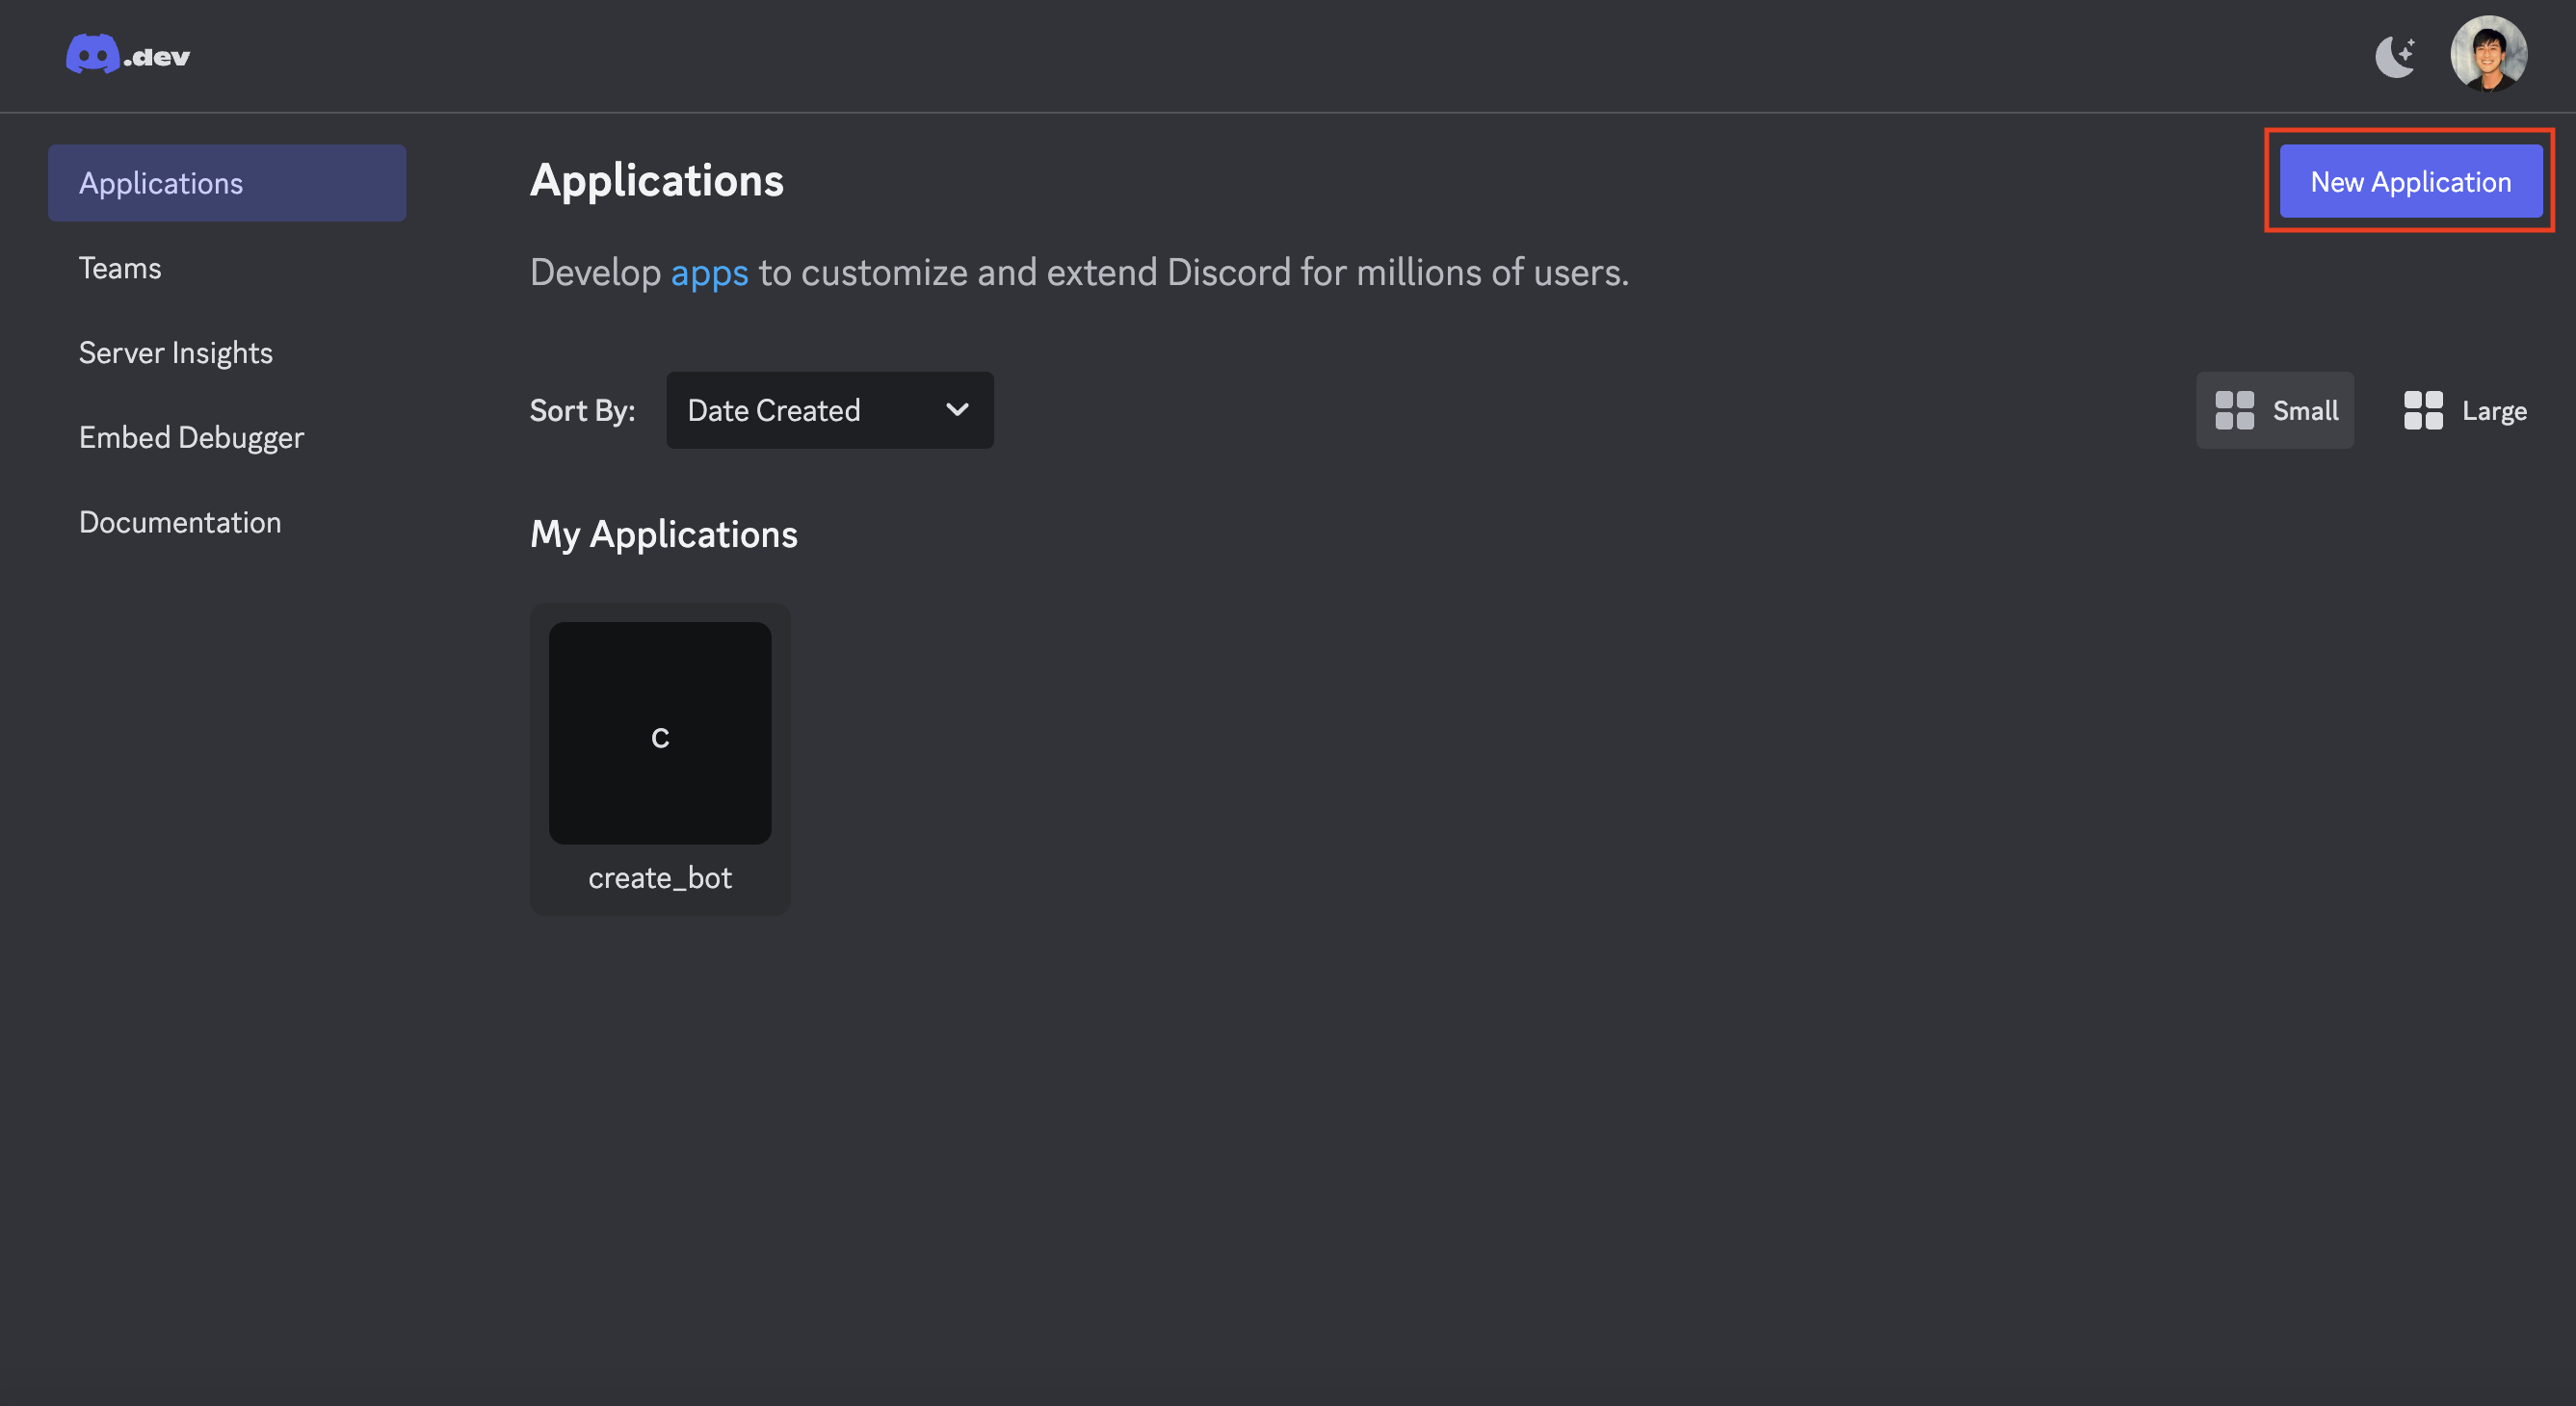
 Click "New Application" to create a new Discord application.
 ## Generate API credentials
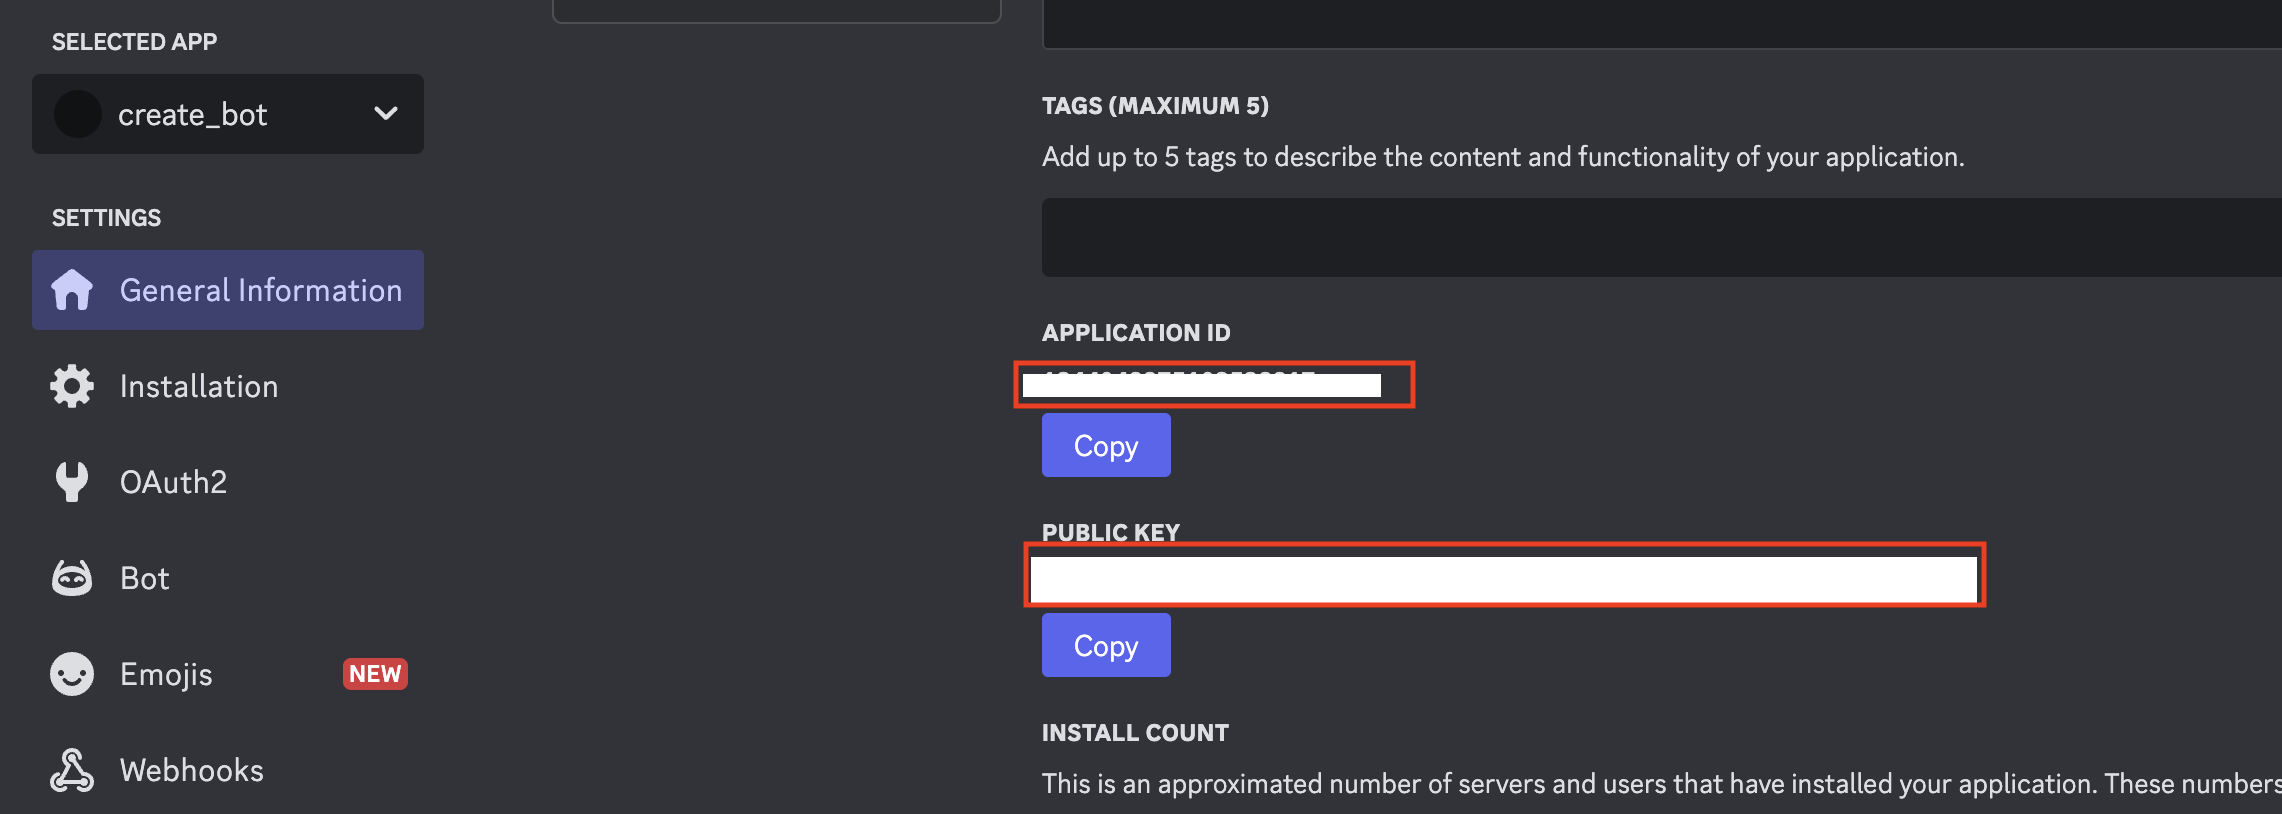
1. Find your Public Key and Application ID in the General Information section.
## Generate API credentials
1. Find your Public Key and Application ID in the General Information section.
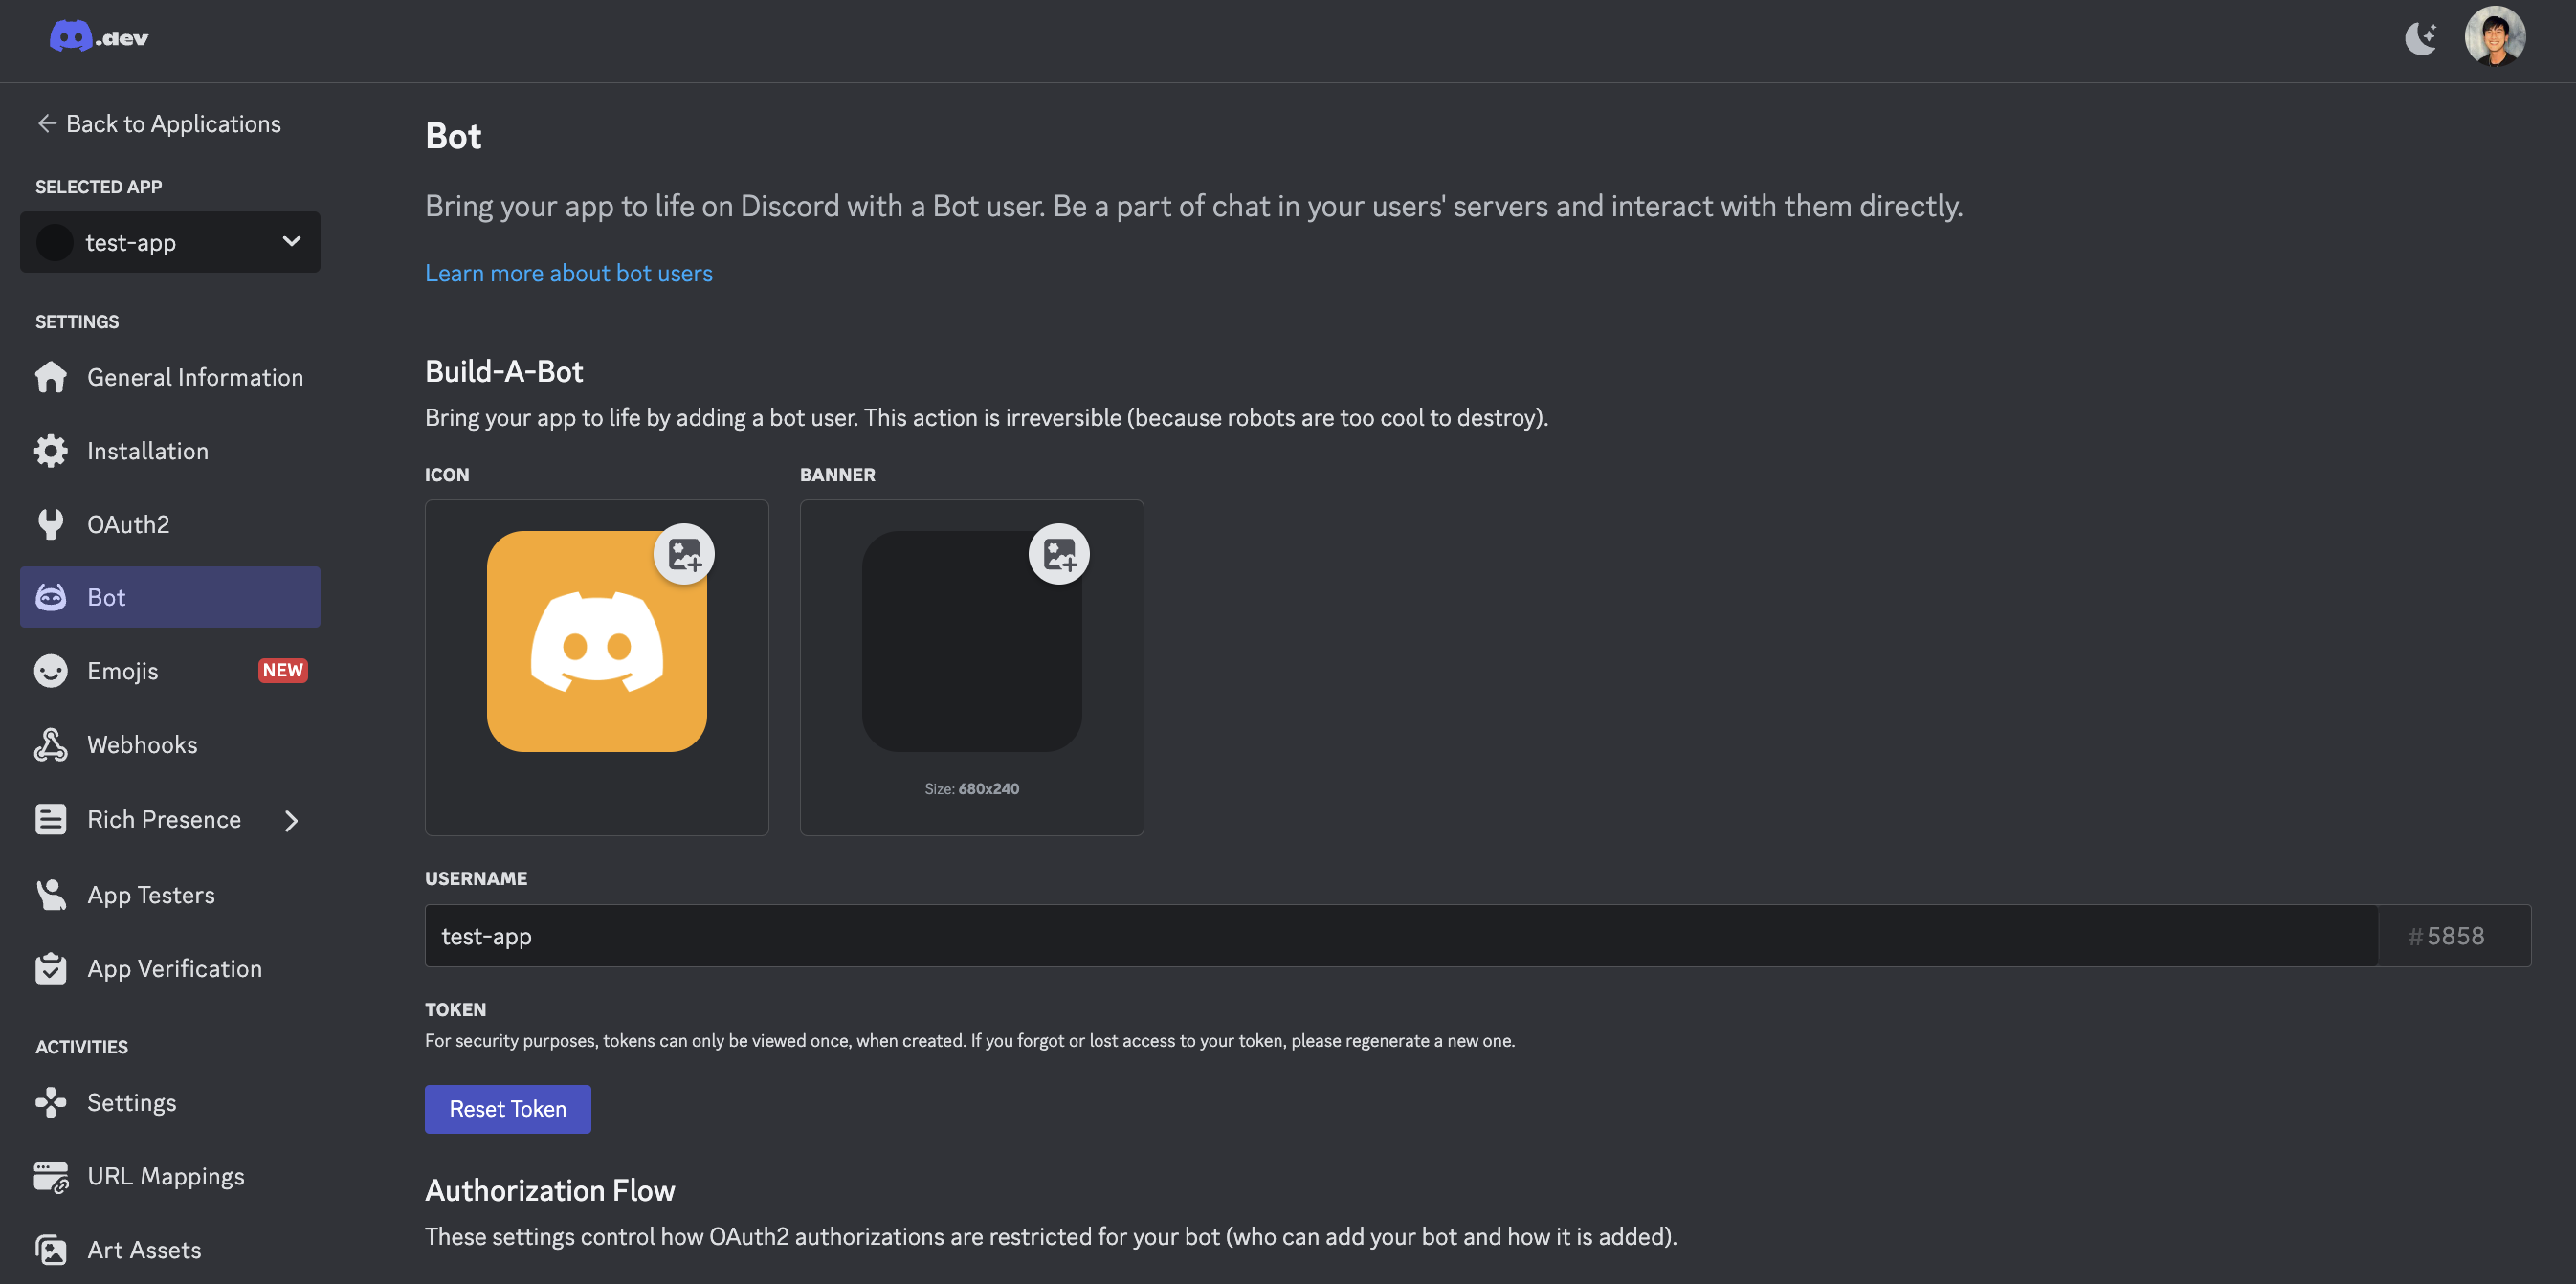
 1. In the Bot settings, click "Reset Token" to generate and copy your bot token.
 Keep your bot token secure - it grants full access to your bot.
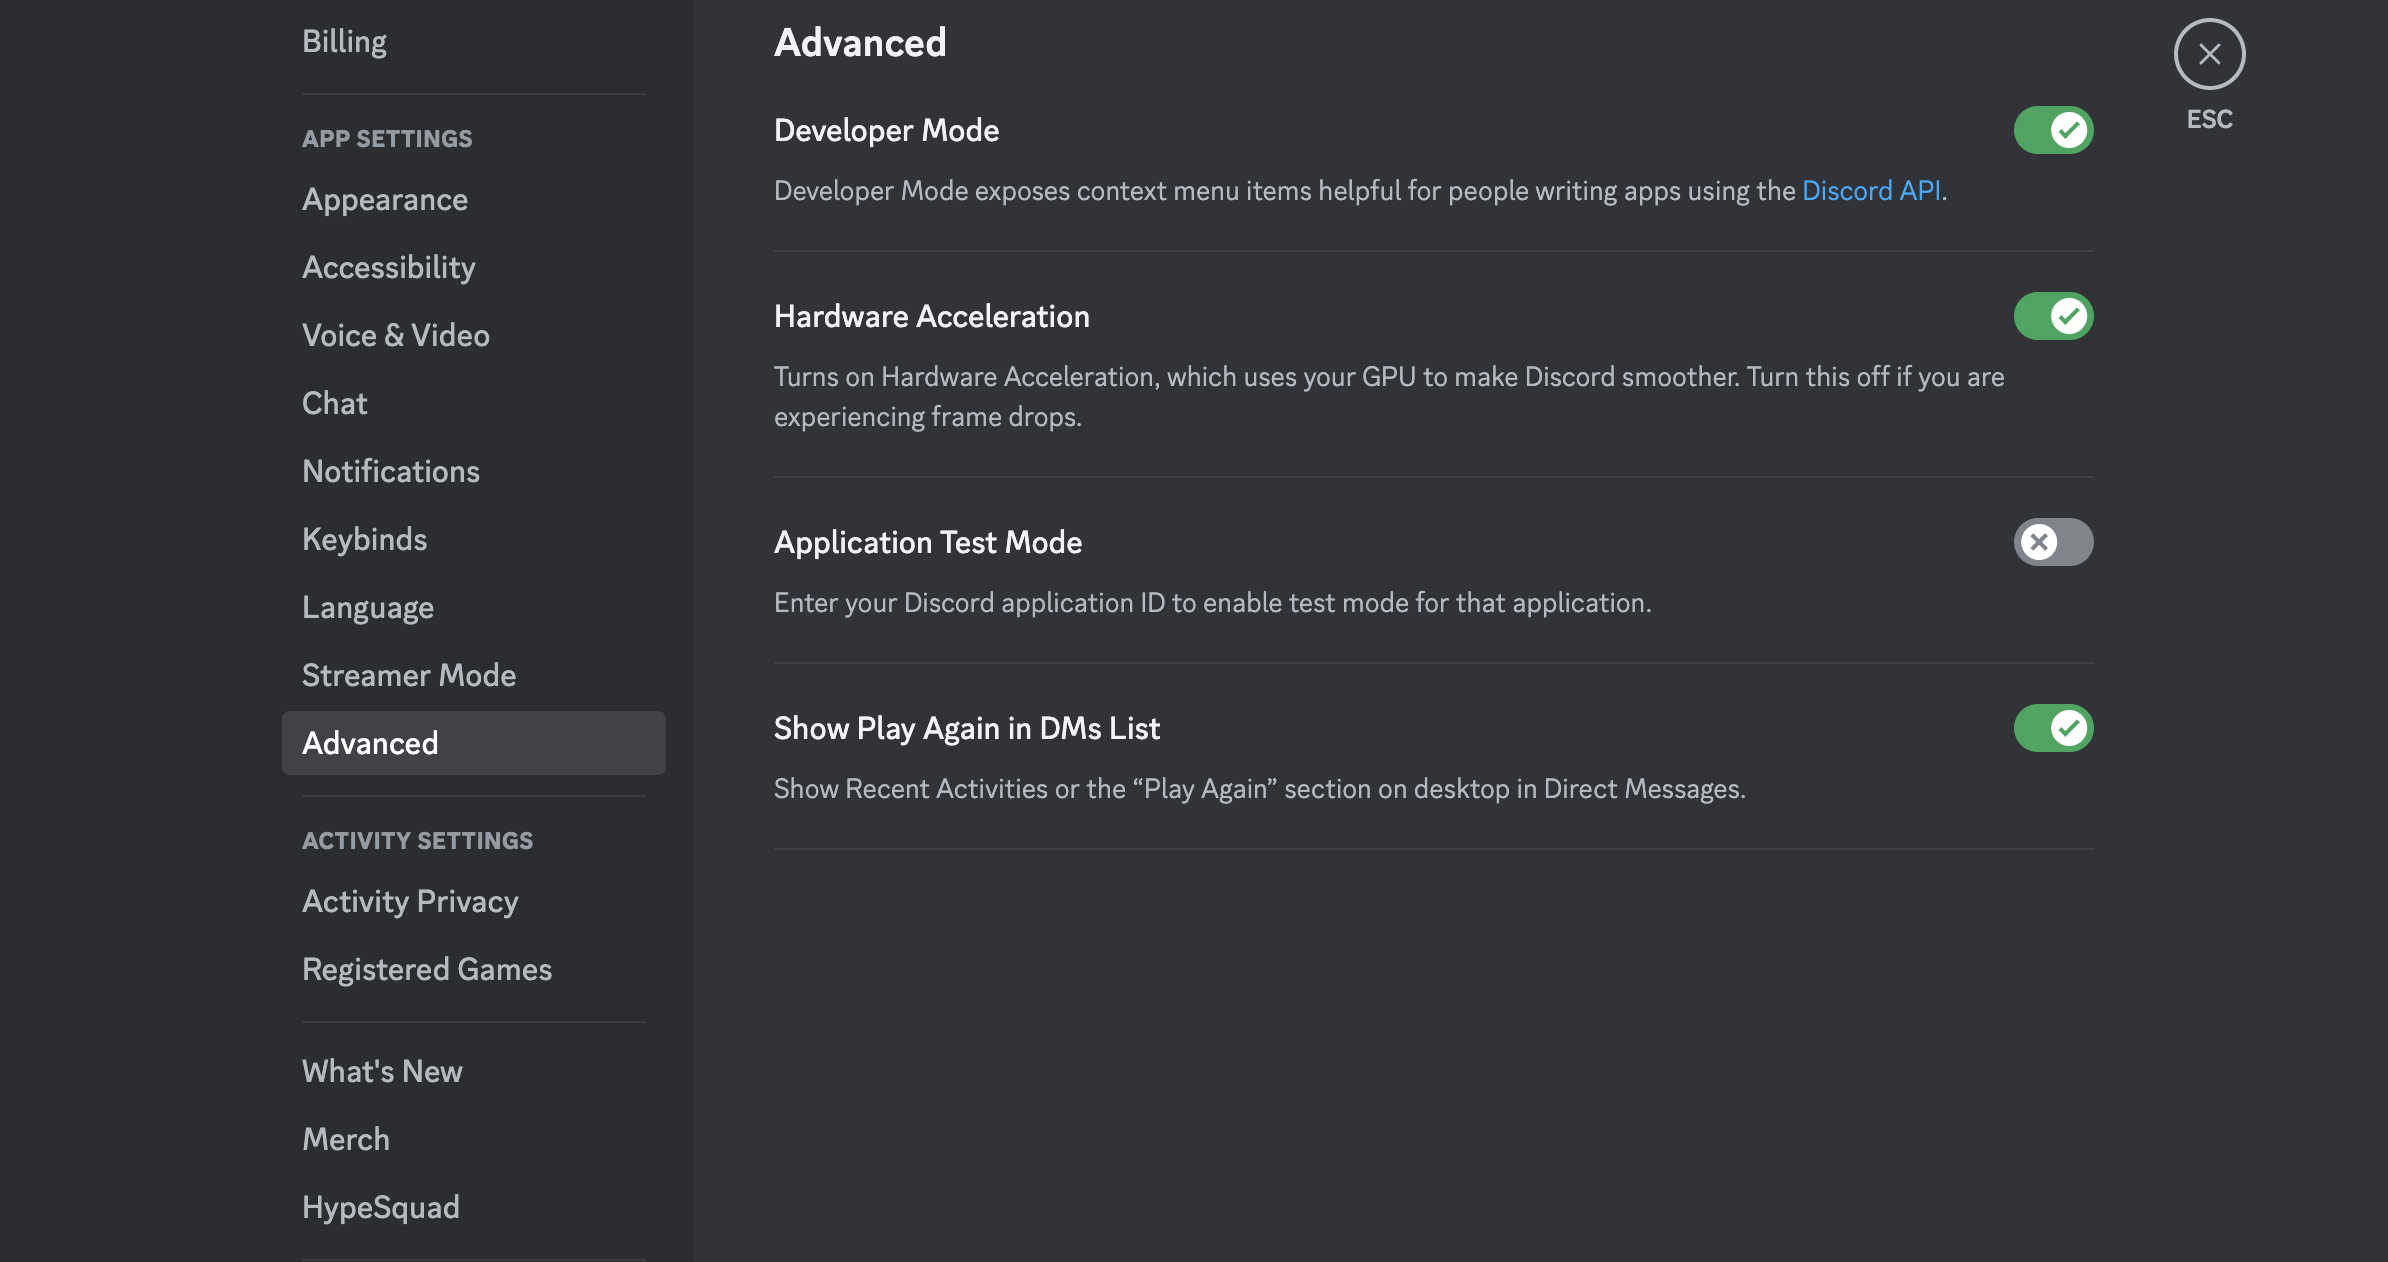
1. Go into your settings for the main Discord messaging application.
2. Find the advanced tab and enable developer mode.
Keep your bot token secure - it grants full access to your bot.
1. Go into your settings for the main Discord messaging application.
2. Find the advanced tab and enable developer mode.
 3. Right click the server icon you want your bot to join in your list of servers.
4. Copy the Server ID.
3. Right click the server icon you want your bot to join in your list of servers.
4. Copy the Server ID.
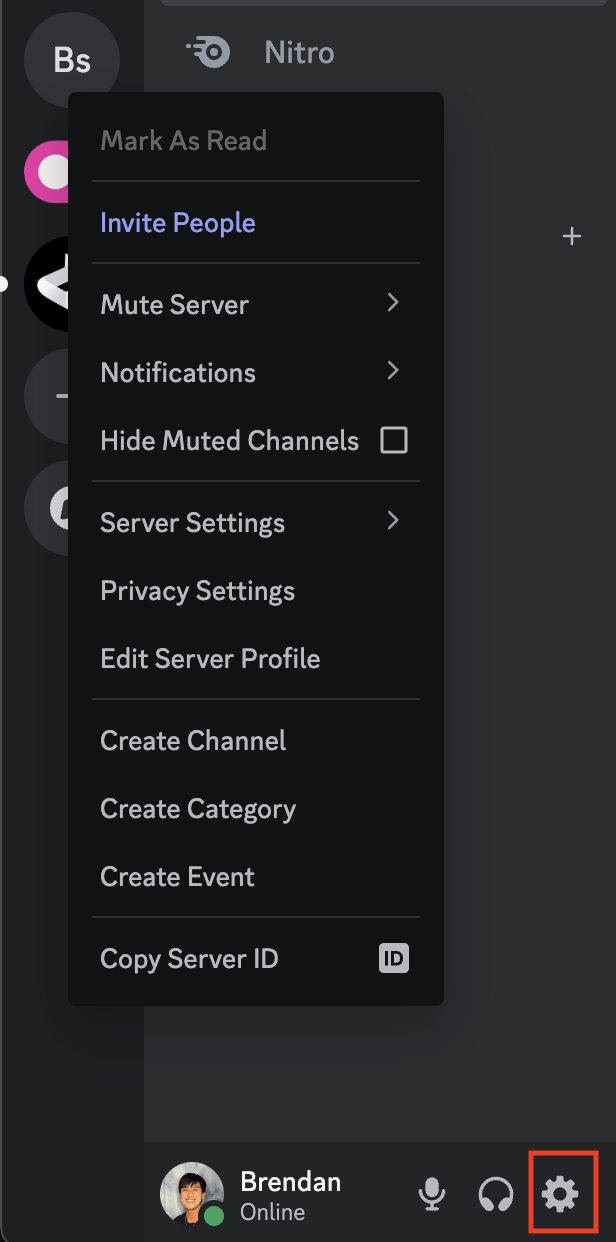 Guild ID is the same as Server ID. They call it Guild to make it sound cool.
## Verify settings
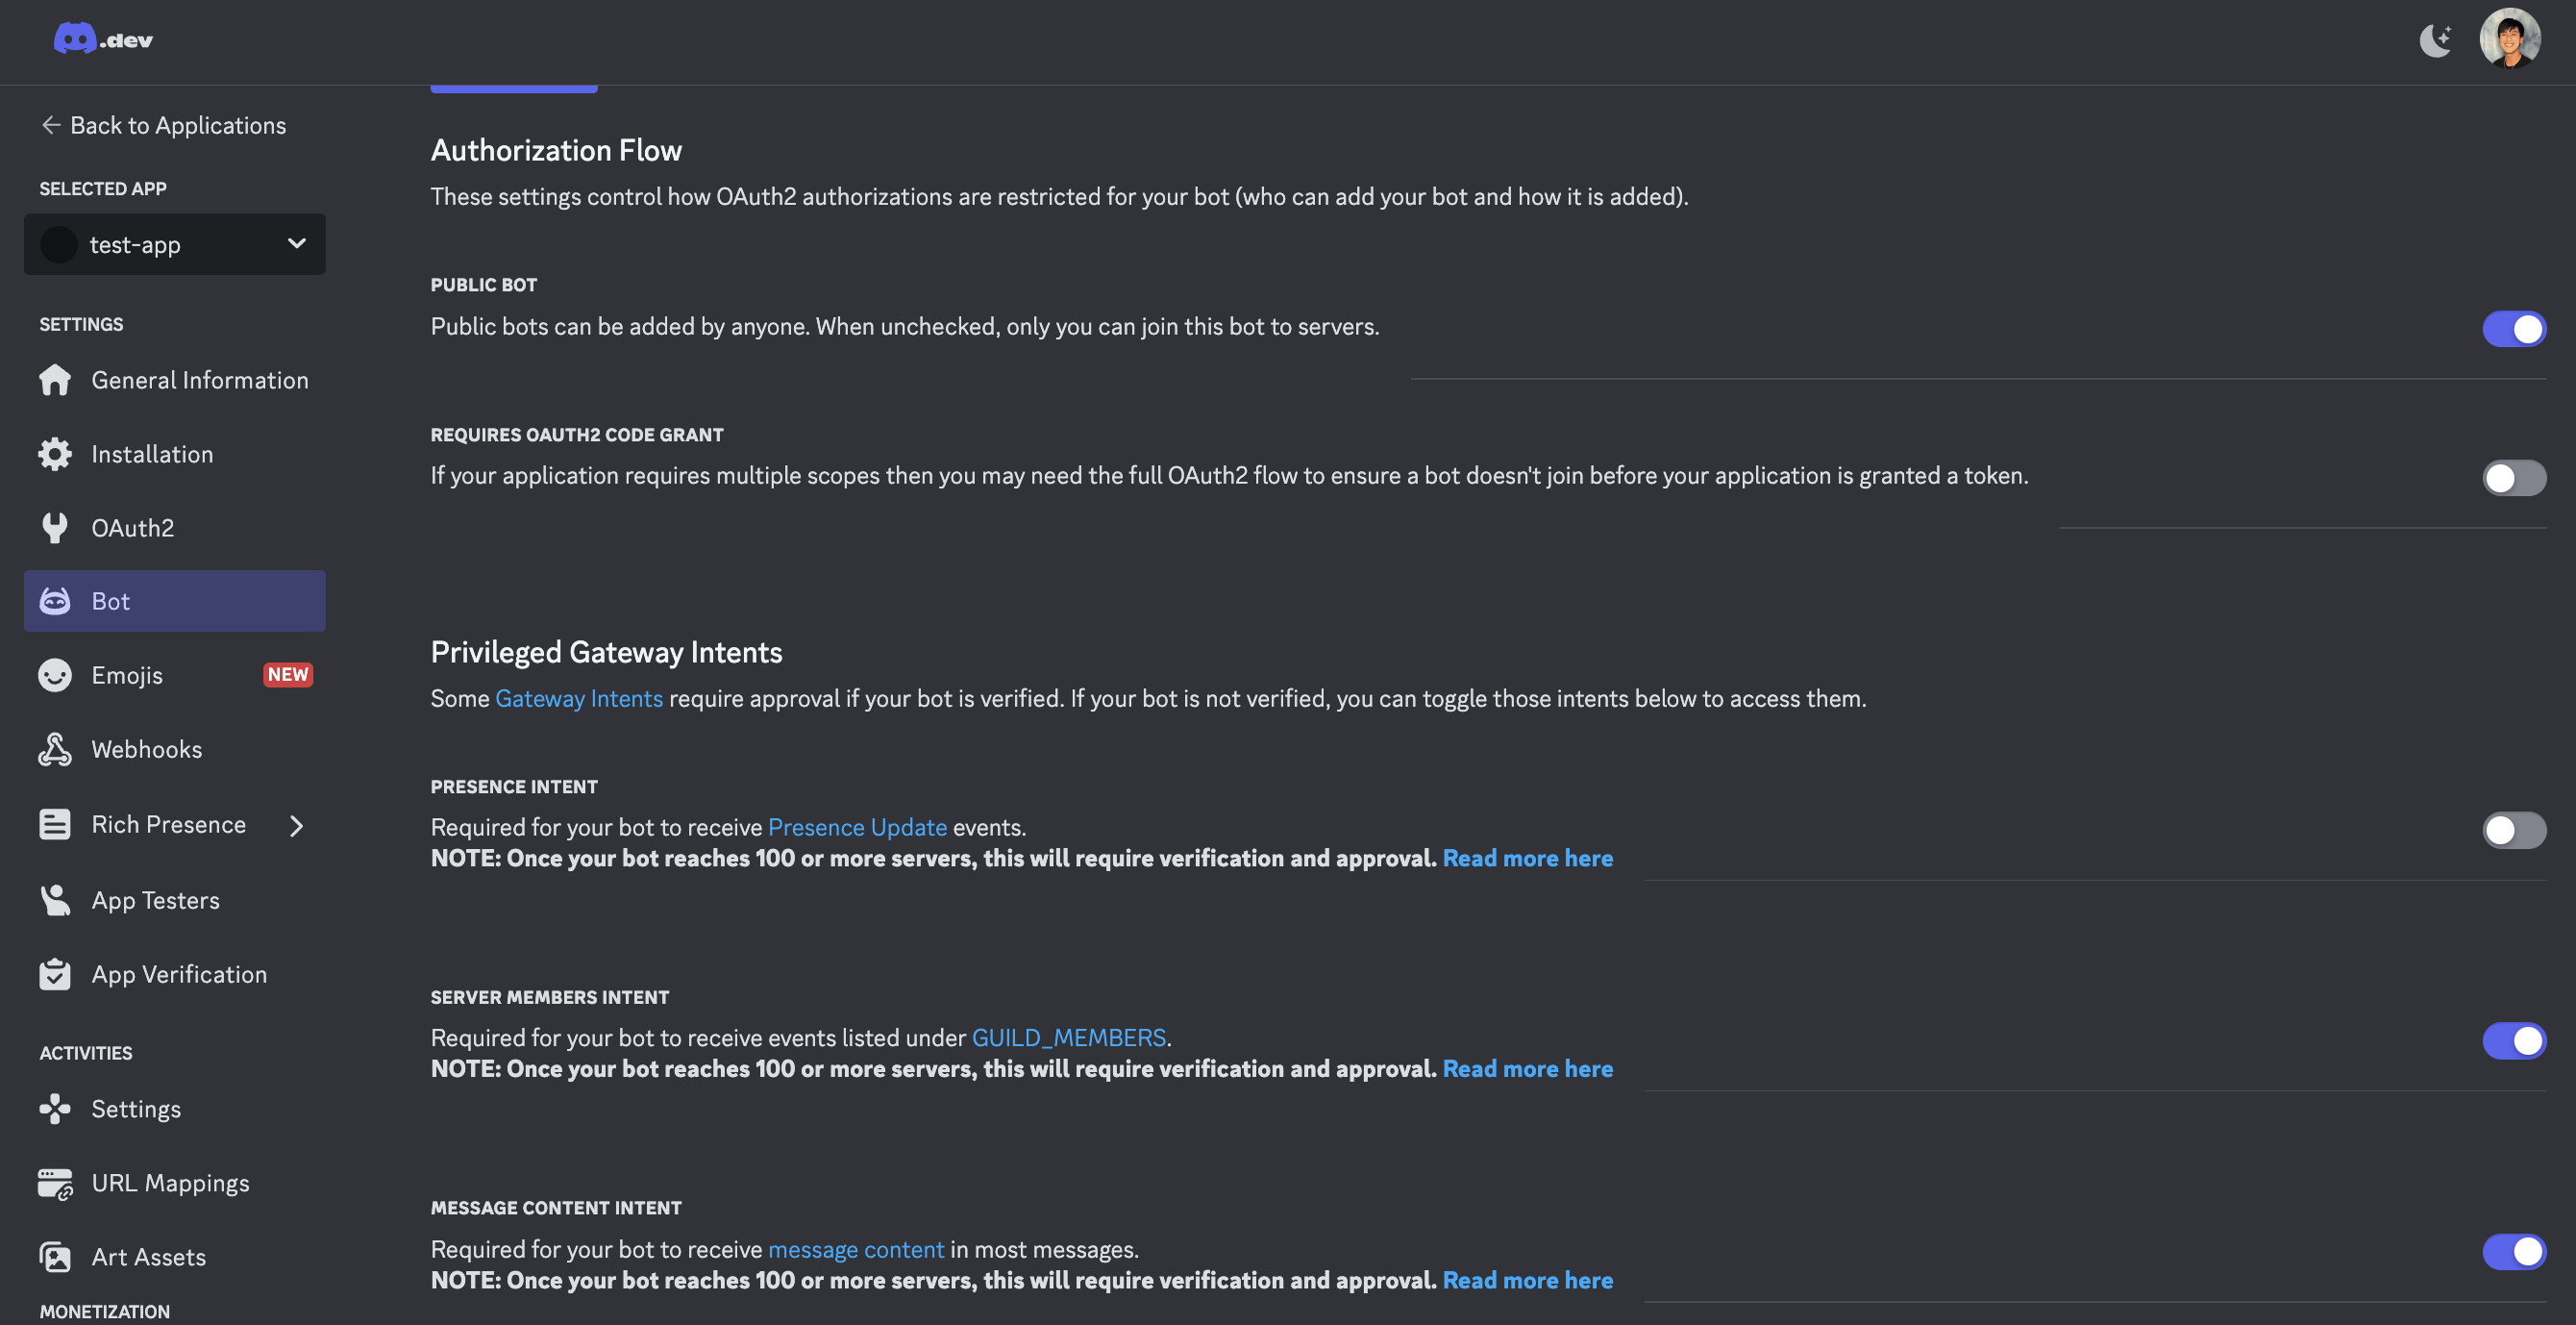
1. Head back to the Discord Developer portal and into the Bot section to enable Public Bot to allow others to download your bot.
2. Enable Server Members intent to allow interactions with the server members.
3. Enable Message Intent to allow the bot to interact with messages in the server.
Guild ID is the same as Server ID. They call it Guild to make it sound cool.
## Verify settings
1. Head back to the Discord Developer portal and into the Bot section to enable Public Bot to allow others to download your bot.
2. Enable Server Members intent to allow interactions with the server members.
3. Enable Message Intent to allow the bot to interact with messages in the server.
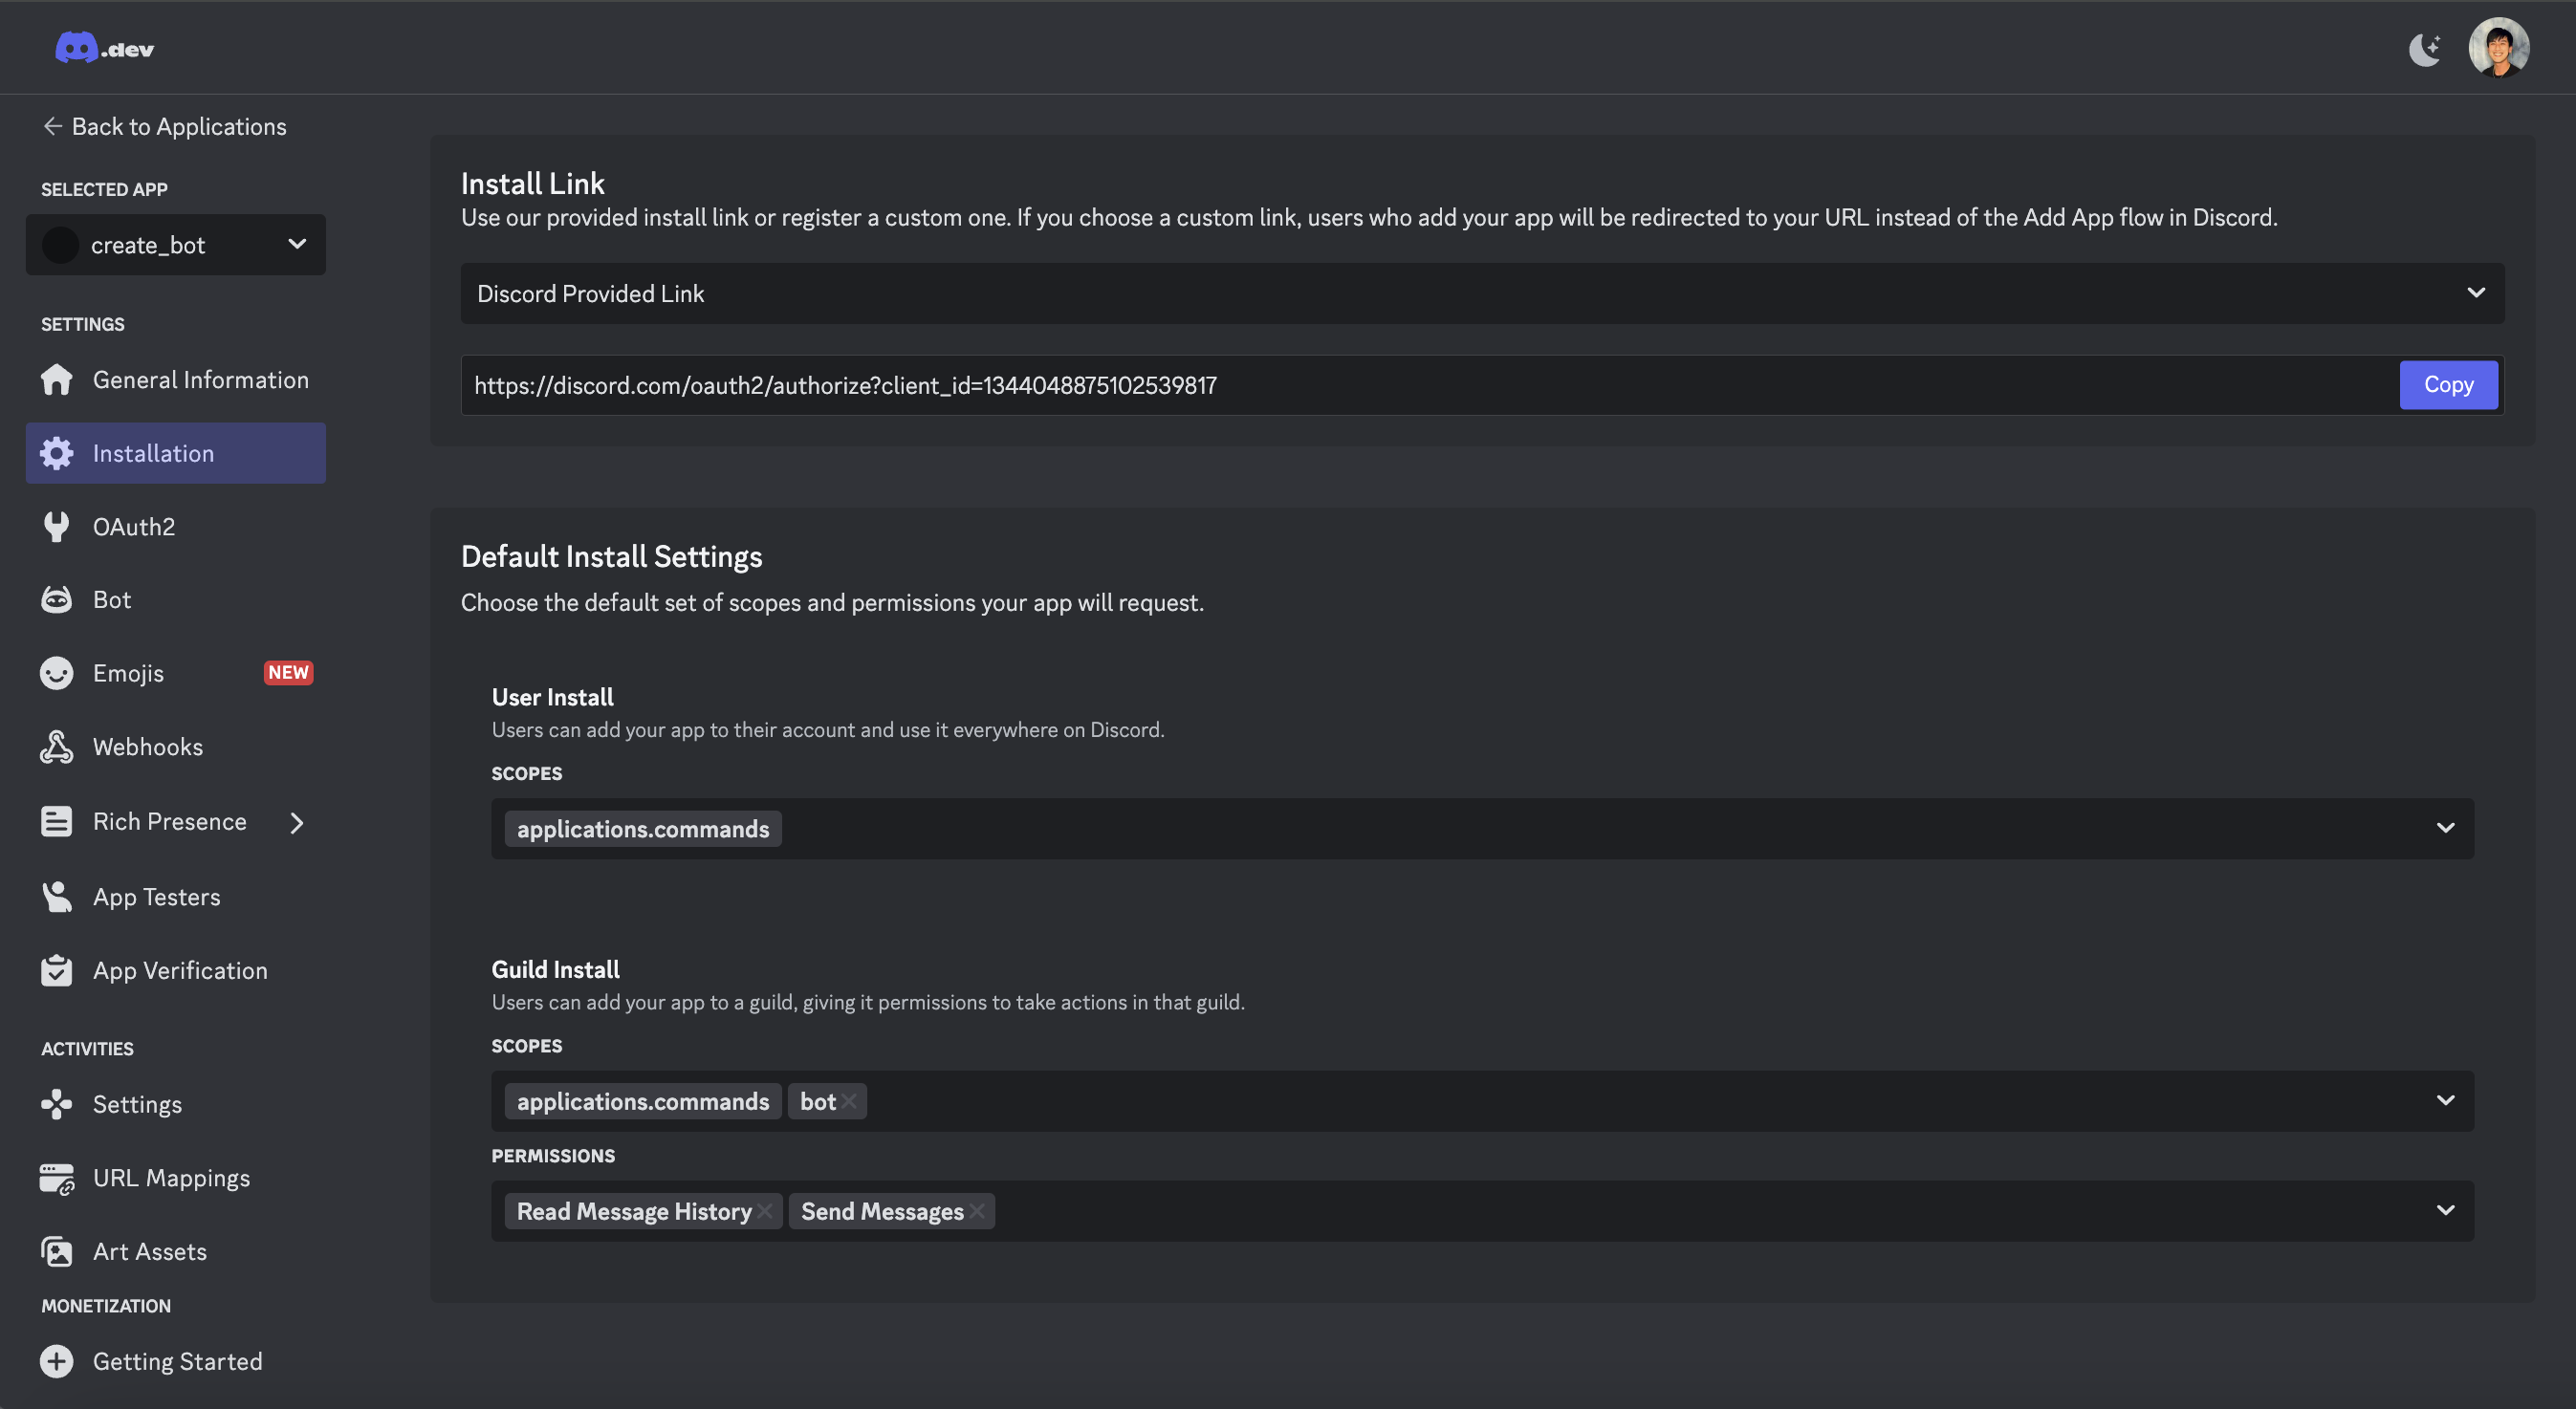
 1. Go into the Install section and scroll down to find the Default Install Settings
2. Under Guild Install, click the drop down under scopes and add Bot to the list
3. Under Permissions, enable Send Message and Read Message history.
1. Go into the Install section and scroll down to find the Default Install Settings
2. Under Guild Install, click the drop down under scopes and add Bot to the list
3. Under Permissions, enable Send Message and Read Message history.
 Add more permissions here based on your Discord bot needs.
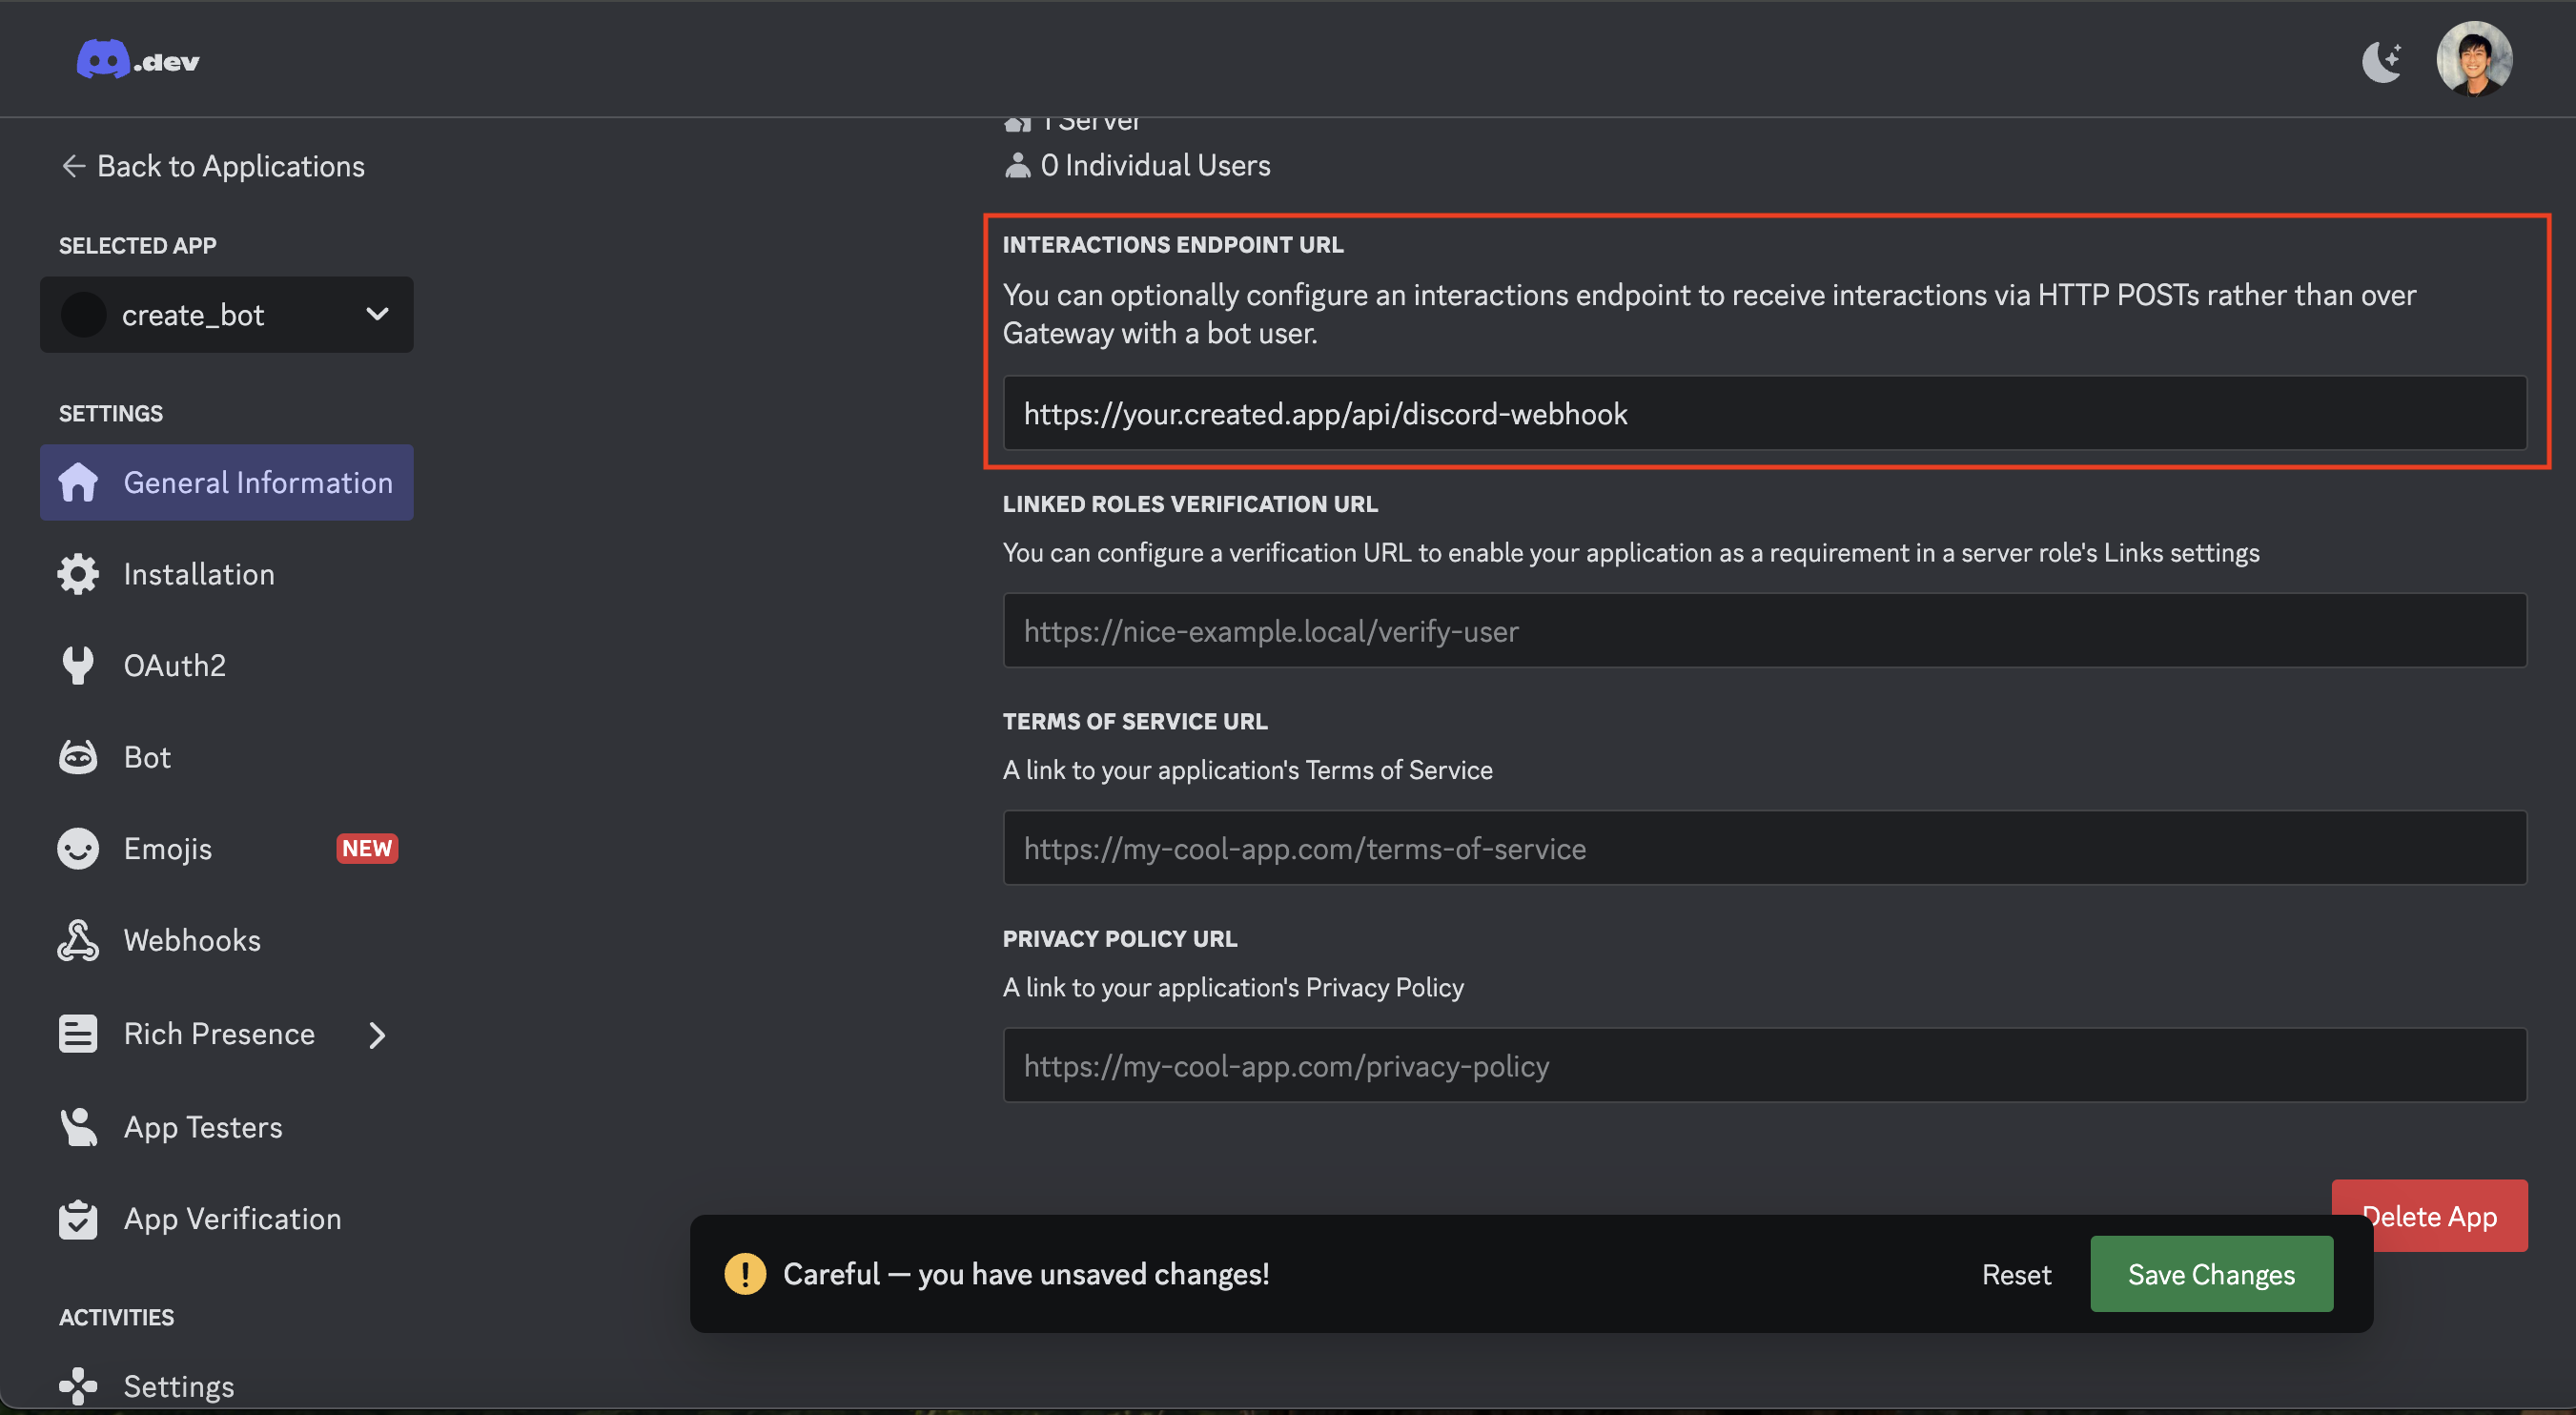
1. Revisit the General Information section and scroll down to find the Interactive Endpoint URL
2. Copy your Anything project's base URL along with api/discord-webhook similar to the example picture.
Make sure your Anything project is published and available on the internet
3. Once you click "Save Changes", the endpoint should have verified successfully.
Add more permissions here based on your Discord bot needs.
1. Revisit the General Information section and scroll down to find the Interactive Endpoint URL
2. Copy your Anything project's base URL along with api/discord-webhook similar to the example picture.
Make sure your Anything project is published and available on the internet
3. Once you click "Save Changes", the endpoint should have verified successfully.
 Having issues with setup? Please reach out to the community on our [Discord](https://discord.com/invite/A4mjfuhwHj).
## Setting slash commands
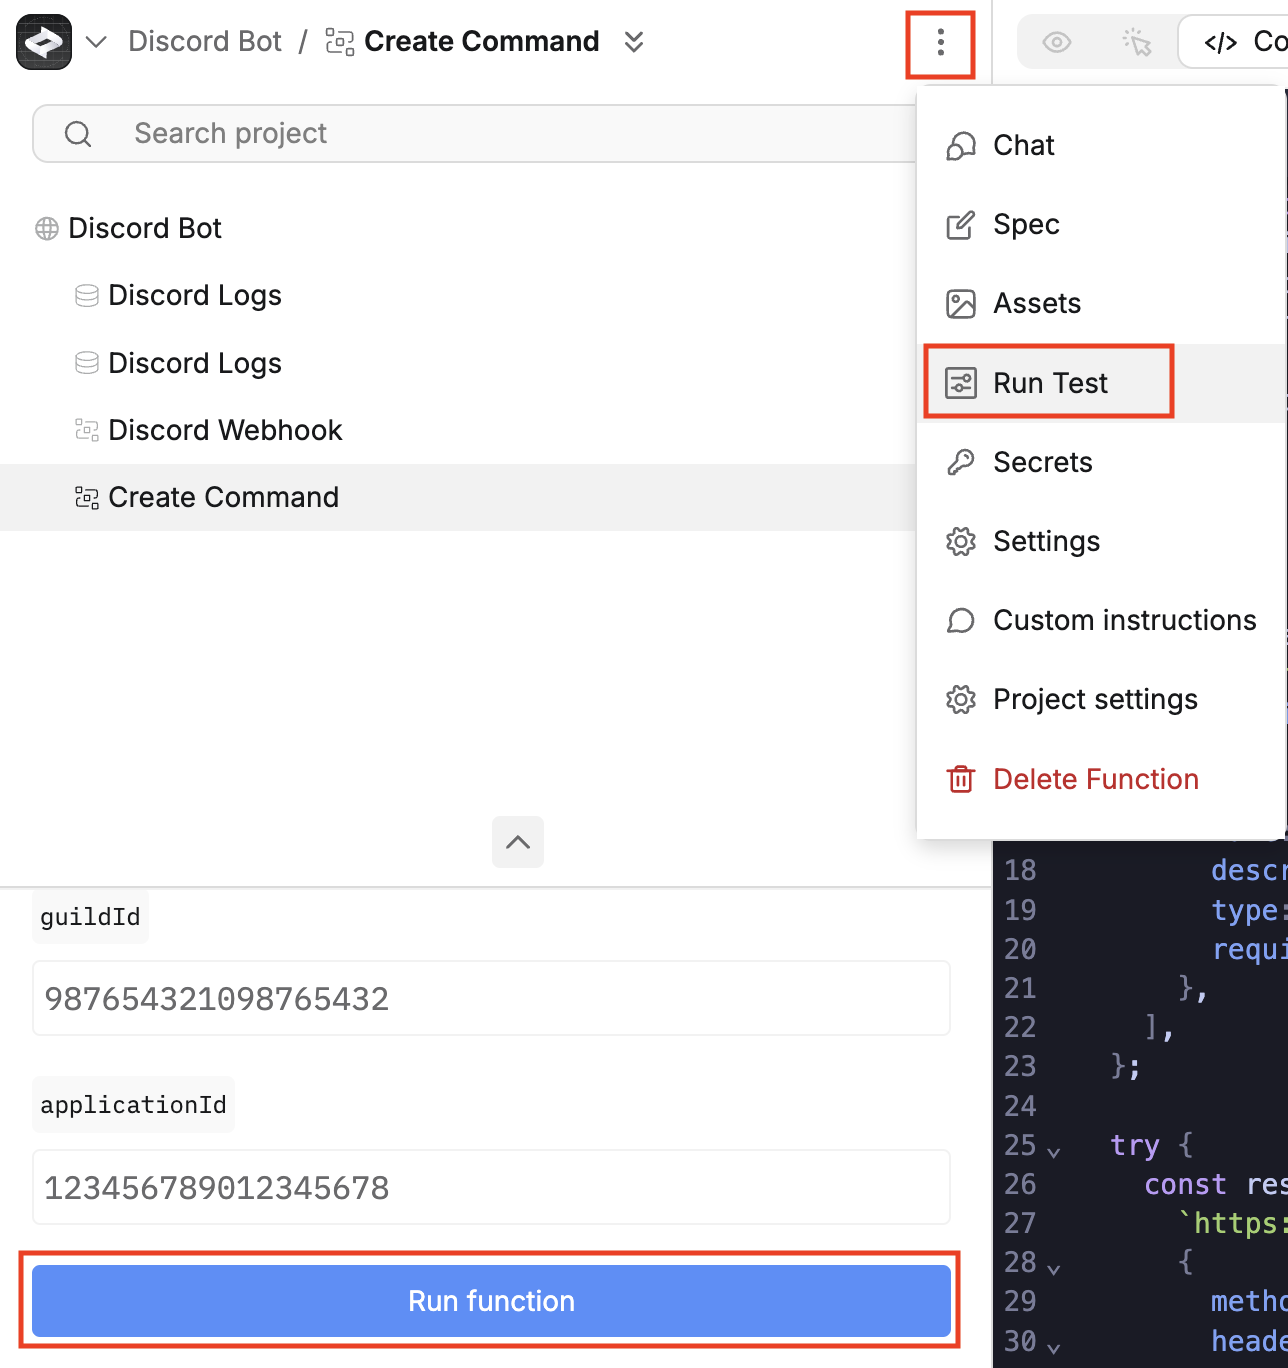
1. In your Anything project, run the Create Command function in the Run Test option. This will create a /chatgpt command for your bot.
You may skip the inputs and click "Run Test", if you have the your secrets/credentials setup.
Having issues with setup? Please reach out to the community on our [Discord](https://discord.com/invite/A4mjfuhwHj).
## Setting slash commands
1. In your Anything project, run the Create Command function in the Run Test option. This will create a /chatgpt command for your bot.
You may skip the inputs and click "Run Test", if you have the your secrets/credentials setup.
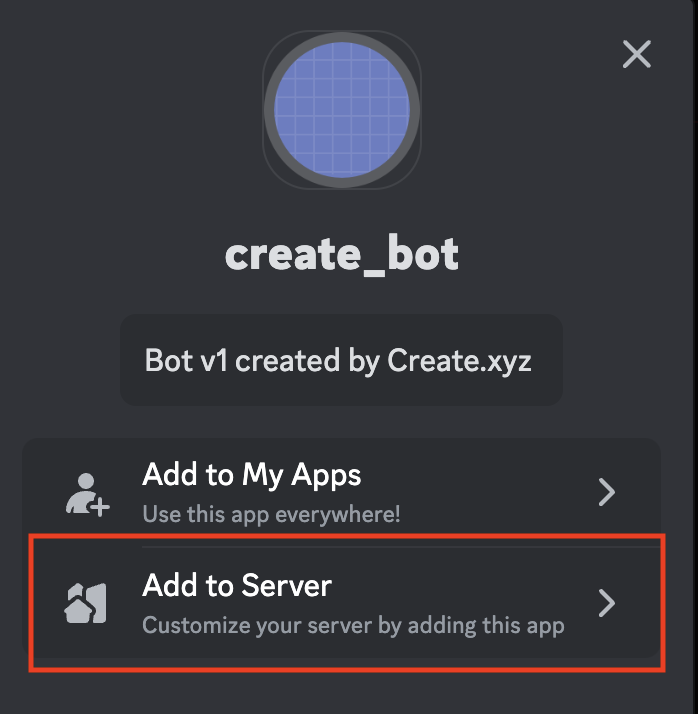
 1. In the installation section, scroll down to find your installation link.
2. Copy and paste it into your browser and add your bot to your server.
1. In the installation section, scroll down to find your installation link.
2. Copy and paste it into your browser and add your bot to your server.
 Send a test message using "/chatgpt Hello!" in your Discord server to verify that your bot is online and responding.
 ## Add to Anything project
1. In your Anything project, type `/` in chat.
2. Select "Discord" from the menu.
1. Paste your Bot Token into "DISCORD\_BOT\_TOKEN".
2. Paste your Application ID to "DISCORD\_APP\_ID".
3. Paste your Public Key to "DISCORD\_PUBLIC\_KEY".
4. Paste your Server ID to "DISCORD\_GUILD\_ID".
Need new credentials? Regenerate in the Discord Developer Portal.
Use prompts to implement Discord features:
* `Send a welcome message using /Discord`
* `Build a chatbot that uses /Discord for customer support`
* `Set up a notification system with /Discord`
The Discord API has rate limits. If something fails, wait a moment and try again.
Discord integration complete! Use `/Discord` in chat to access messaging capabilities.
## Frequently asked questions
Discord API allows you to interact with Discord's messaging platform, enabling you to send messages, build bots, and manage server interactions.
Yes, you need a Discord Developer Account to access the API and create a bot. The account is free and sufficient for testing and development.
The bot works by listening to events in Discord and responding to commands or messages based on your implementation.
You can build:
* Chatbots for customer support
* Notification systems for events
* Interactive games and experiences
* Moderation tools for server management
Yes, Discord has API rate limits. Free accounts have lower limits than paid accounts. Check Discord's official documentation for current limits.
Yes, you can test your integration by sending messages to your bot in a server where it has been invited. Monitor the bot's responses to ensure it functions as expected.
## Add to Anything project
1. In your Anything project, type `/` in chat.
2. Select "Discord" from the menu.
1. Paste your Bot Token into "DISCORD\_BOT\_TOKEN".
2. Paste your Application ID to "DISCORD\_APP\_ID".
3. Paste your Public Key to "DISCORD\_PUBLIC\_KEY".
4. Paste your Server ID to "DISCORD\_GUILD\_ID".
Need new credentials? Regenerate in the Discord Developer Portal.
Use prompts to implement Discord features:
* `Send a welcome message using /Discord`
* `Build a chatbot that uses /Discord for customer support`
* `Set up a notification system with /Discord`
The Discord API has rate limits. If something fails, wait a moment and try again.
Discord integration complete! Use `/Discord` in chat to access messaging capabilities.
## Frequently asked questions
Discord API allows you to interact with Discord's messaging platform, enabling you to send messages, build bots, and manage server interactions.
Yes, you need a Discord Developer Account to access the API and create a bot. The account is free and sufficient for testing and development.
The bot works by listening to events in Discord and responding to commands or messages based on your implementation.
You can build:
* Chatbots for customer support
* Notification systems for events
* Interactive games and experiences
* Moderation tools for server management
Yes, Discord has API rate limits. Free accounts have lower limits than paid accounts. Check Discord's official documentation for current limits.
Yes, you can test your integration by sending messages to your bot in a server where it has been invited. Monitor the bot's responses to ensure it functions as expected.